Difference between revisions of "Virtual File"
From ISBoxer
| Line 1: | Line 1: | ||
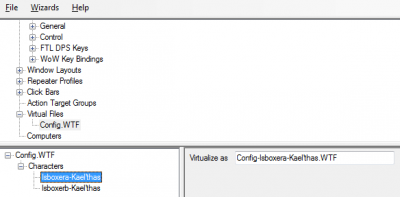
[[File:Virtual file.png|400px|thumb|right|Editing a Virtual File]] | [[File:Virtual file.png|400px|thumb|right|Editing a Virtual File]] | ||
A [[Virtual File]] can direct the game to a given file in place of another. This is typically used to use a single folder for performance reasons, while keeping multiple configurations. | A [[Virtual File]] can direct the game to a given file in place of another. This is typically used to use a single folder for performance reasons, while keeping multiple configurations. | ||
| + | |||
| + | The [[Quick Setup Wizard]] sets up some Virtual Files automatically for your convenience. | ||
== Creating a Virtual File == | == Creating a Virtual File == | ||
| + | # In the top pane, right click Virtual Files | ||
| + | # Select New Virtual File from the drop-down menu | ||
| + | # Rename the new Virtual File to the actual filename on the disk, without the path. For example, Config.WTF, or LauncherUserSettings.XML | ||
| + | # Now, for each Character that will need this file virtualized | ||
| + | ## Drag the Character from the top pane into the bottom left pane with the Virtual File selected (visible in the bottom left pane) | ||
| + | ## Select the Character in the bottom left pane, so that on the bottom right pane you see "Virtualize as" with a box next to it | ||
| + | ## In the Virtualize as box, enter the new filename, without the path. For example, Config-MyCharacter.WTF, or LauncherUserSettings-MyAccount.XML | ||
| + | |||
| + | In this fashion, each Character can have its own version of a settings file, or share with certain others, etc. | ||
== See Also == | == See Also == | ||
| + | * [[Quick Setup Wizard]] | ||
Revision as of 21:58, 8 January 2011
A Virtual File can direct the game to a given file in place of another. This is typically used to use a single folder for performance reasons, while keeping multiple configurations.
The Quick Setup Wizard sets up some Virtual Files automatically for your convenience.
Creating a Virtual File
- In the top pane, right click Virtual Files
- Select New Virtual File from the drop-down menu
- Rename the new Virtual File to the actual filename on the disk, without the path. For example, Config.WTF, or LauncherUserSettings.XML
- Now, for each Character that will need this file virtualized
- Drag the Character from the top pane into the bottom left pane with the Virtual File selected (visible in the bottom left pane)
- Select the Character in the bottom left pane, so that on the bottom right pane you see "Virtualize as" with a box next to it
- In the Virtualize as box, enter the new filename, without the path. For example, Config-MyCharacter.WTF, or LauncherUserSettings-MyAccount.XML
In this fashion, each Character can have its own version of a settings file, or share with certain others, etc.
