I have decided that I will take on this challenge since I have found some nice ways to represent each of the idea requested by Lax. This is going to be a 4 part tutorial and laid out in a way that helps to support a modular concept as much as possible.
Part 1 - Modifying the existing clickbars (Supporting concepts for handling additional buttons to our pre-existing clickbars)
Part 2 - NumKey On the Fly Reassignment - 5 States (This demo's multiple image changing and active keymap controlling)
Part 3 - Priest Buff Key's and State On/Off (This demo's multiple logic keys with a hide key)
Part 4 - Virtual G-Keys with On/Off with Color Feedback (This demo's toggle from another clickbar as well as activation of keymaps and support to secondary clickbar actions and self action color feedback)
Here is an example of all these concepts running from my laptop on the main toon's screen.
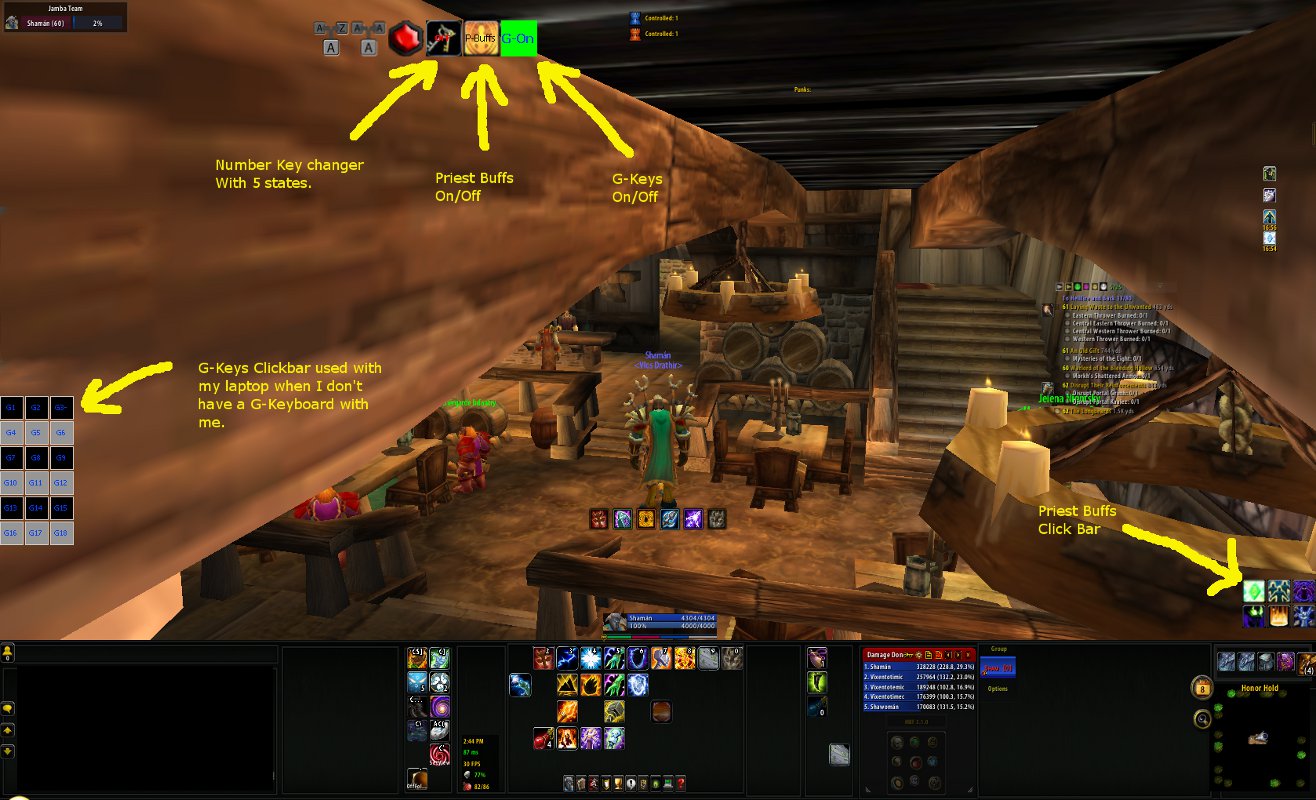
- Advanced Click Bars.jpg (183.03 KiB) Viewed 18992 times
To better have some understanding why I have chosen these 4 parts to represent the tutorial as a whole I have done some reading on the forums. Some of the things that most people are trying to do but ask for help on. Sometimes something as basic as why does my clickbar button not pass my clicks to the correct client can be a frustration that I hope to help with here. I want to point out that Lax has created some very informative documents on how all of this works.
Part 1 - Modifying the existing clickbarTo be honest, while these items listed below may seem to be a given, it's not. I am going to cover the basics.
- When setting up a clickbar button this is a basic rule of thumb, the action that you are making is for use with a Target of "Window:Current" and all the other mechanics to point elsewhere is integrated into the actions being macro'ed. This is not a hard logical rule that I'm aware of, just a rule that I use in this tutorial.
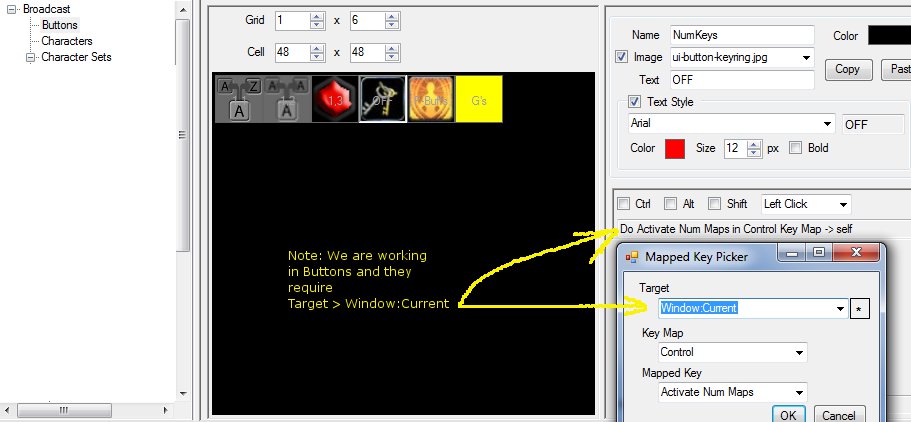
- Advanced Click Bars-CurrentWindowRule.jpg (56.48 KiB) Viewed 18992 times
- You will have to provide any new icon's used for your clickbar buttons into the clickbar "Images (global)" based on your preferences: MiRae created this post with a link to image RAR http://isboxer.com/forum/viewtopic.php?f=27&t=252. There are some other pre-existing packs that are linked on these forums that you should be able to easily find.
- Once you have started creating a clickbar or are working on an existing clickbar buttons are all the same size for that bar. Don't worry though, you can make as many bars in as many sizes as required.
- Clickbars can get very complicated, the best rule of thumb is "keep it simple solutions"(kiss), you will be much happier in the end, but don't cut corners or you will find yourself rebuilding to get a better result.
- When changing the grid numbers, the first number is the row, the second number refers to the columns. A 1x6 would be one row six buttons wide. A 6x1 would be one column and six buttons tall.
Part 2 - NumKey On the Fly Reassignment - 5 StatesDescription: When faced with a limited number of keys on your keyboard we can re-purpose keys on the fly. Change how they react and what toons they react to, even while in combat.
This is very helpful in situations where you may have to change your healing strategy on the fly or targeting, no matter how you slice and dice the concept it can add up to 12 keys and 24 keystrokes(press/release) depending on how you play and setup your keys. In the tutorial below we do not use Num0(zero), Num+(plus), or Num-(minus) but they could easily be used on your setup. During this part of the tutorial I have decided to keep it simple and opted for five sets, the list below indicates the names and uses for each:
- All Off (This disables the special mappings completely)
- NumKeys-Heals (This is for my healer, the assigned set contains mapped keys specific for healing)
- NumKeys-General-Self (This set is used for your "main" selected current:window and will not send to others)
- NumKeys-General-All (This will send the same key to all the windows, think keyboard repeater for just numkeys)
- NumKeys-General-Alts (This sends the key press to the alternate windows and not your main)
Section 1:Lets get started, remember this is simply just an example of possible ways you could layout your NumKeys.
1. We are not going to create a Key Map for "All Off" since that is a state change action only, we will get to that in a few steps.
2. First you want to start off by creating the first of four new Key Maps named above. So start with "
NumKeys-General-Self" for an easy setup.
3. Now that you have your first "Key Map" create 9 new mapped Keys using the "Many New Mapped Keys" selection now available by right clicking on Mapped Keys in the bottom left window. Set your target for "Window:Current" then click in the "-Press a key combination here -" and press your numkeys starting from 1 and going up to 9. Now hit "OK".
4. Now, lets create the "Key Map" for "
NumKeys-General-All". You will use the "Many New Mapped Keys" technique as you did above to map these new 9 keys, this time the target is set to "Window: All w/ Current".
5. Next, lets create the "Key Map" for "
NumKeys-General-Alts". You will use the "Many New Mapped Keys" technique as you did above to map these new 9 keys, this time the target is set to "Window: All w/o Current".
6. Then, lets create the "Key Map" for "
NumKeys-Heals". You will use the "Many New Mapped Keys" technique as you did above to map these new 9 keys, this time the setup should include healing macro's you have setup for your healer, if it's a priest or shaman, druid or paladin, I would hope you have at lease a few spells you could assign here. For each of these macro's your target will be set to "Character: <insert name of healer>".
7. For each of your newly created Key Maps you will want to drag your "Character Sets" into the lower left window to have each set apply to your team(s), then the new Key Map sets are ready to go.
All your Key Maps are now created and ready to be used. If you decided to venture from this limited set of instructions thats fine, but please be sure that you have good working macro's for the selected Key Maps.
If you followed section 1 correctly you should have something that looks like this:
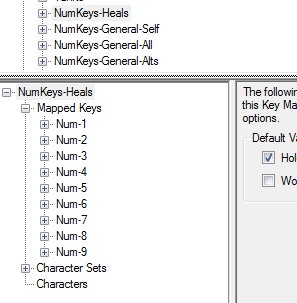
- Advanced Click Bars-CreateKeyMaps.jpg (18.05 KiB) Viewed 18992 times
We will create the Click Bar button that will provide our changer and image feedback on the click bar button.
1. You have a choice here, either you create a new Click Bar or you can add a button to your "Broadcast" Click Bar. I will cover how to add a button to your "Broadcast" Click Bar.
2. Select Click Bars > Broadcast in the upper pane, then select button in the lower left pane. In the middle pain you want to increase the number of buttons so update the second "Grid" number by increasing it up one.
3. Click into the new button and in the lower right pane change the following:
Name = NumKeys
Text = NC
Check Text Style, set to: Arial, Color: Red 255, Size 12,
Check Image: insert a starting image of your choice(I used keyring from wow images)
You will come back and assign our action after we have created it. For now include all your "Character Sets" that will use this system if you created your own custom Click Bar.
Section 3:Now we need to create a control Mapped Key that will provide our mechanics.
1. Please go to Key Maps > Control and create a new Mapped Key named "Activate Num Maps"
2. Create 5 steps to this Mapped Key
a. Step one will contain the following "Actions":
Create 4 "Key Map Actions">"New Key Map State Action"
1. NumKeys-Heals set On (Target: Window:All w/ Current)
2. NumKeys-General-Self set Off(Target: Window:All w/ Current)
3. NumKeys-General-All set Off(Target: Window:All w/ Current)
4. NumKeys-General-Alts set Off(Target: Window:All w/ Current)
Create "New Popup Text Action" (Target: Window:Current, Text: NumKeys Healing)
Create "Click Bar Actions">"Click Bar Button Action" with the following settings:
Target: Window:All w/ Current
Click Bar: Broadcast
Button: NumKeys
Check Image: set to a healing image you like (I used spell Holy Fanaticism)
Check Text: Heals
b. Step two through five will contain the all the same settings so you can copy all actions from step one and past into the remaining steps but with the following modifications:
Step 2 Changes:
1. NumKeys-Heals set Off
2. NumKeys-General-Self set On
3. NumKeys-General-All set Off
4. NumKeys-General-Alts set Off
5. Change "Popup Text" (Text: NumKeys Self Only)
6. Change "NumKeys in Broadcast Click Bar -> all" settings:
Check Image: set to an image you like (I used spell Shadow Twisted Faith)
Check Text: Self
Step 3 Changes:
1. NumKeys-Heals set Off
2. NumKeys-General-Self set Off
3. NumKeys-General-All set On
4. NumKeys-General-Alts set Off
5. Change "Popup Text" (Text: NumKeys All Repeating)
6. Change "NumKeys in Broadcast Click Bar -> all" settings:
Check Image: set to an image you like (I used spell Holy Prayer of Spirit)
Check Text: All
Step 4 Changes:
1. NumKeys-Heals set Off
2. NumKeys-General-Self set Off
3. NumKeys-General-All set Off
4. NumKeys-General-Alts set On
5. Change "Popup Text" (Text: NumKeys Alts Only)
6. Change "NumKeys in Broadcast Click Bar -> all" settings:
Check Image: set to an image you like (I used achievement PVP g 08)
Check Text: ALTS
Step 5 Changes:
1. NumKeys-Heals set Off
2. NumKeys-General-Self set Off
3. NumKeys-General-All set Off
4. NumKeys-General-Alts set Off
5. Change "Popup Text" (Text: NumKeys Maps OFF)
6. Change "NumKeys in Broadcast Click Bar -> all" settings:
Check Image: set to an image you like (I used Keyring image, the same one used to initialize the button)
Check Text: OFF
All your settings are complete, you could map a key to the main key here and be done or you can finish it out as it's meant to be used and create the link to the clickbar so when you click the button it changes for you.
Section 4:1. Lets go back to your new button you created, if it's in Click Bar > Broadcast then goto the Buttons and click on the button you created. Click on it a second time with a "Left Click" to create an action in your lower right pane.
2. Now click on the small [<] arrow button to setup the key and use the following settings:
Target: Window: Current
Key Map: Control
Mapped Key: Activate Num Maps
That's it, you can now use the new keymap actions and see when they change.
Note, when you first load your games you need to set the Button to either OFF or Self.